- Home
- Artificial Grass
- Applications
- Putting Greens
- Product Selection
Putting Green
Product Selection
Putting green turf selection affects how an artificial putting surface performs over time, including ball roll consistency, green speed, durability, short-game realism, drainage behavior, and maintenance requirements.
Surface performance depends on how turf, infill, base preparation, contouring, and installation precision work together as a complete putting green system.
(Background Putting Green Installation By: US Grass & Greens)
Product Selection
What Product Selection Actually Determines
Putting green product selection determines more than surface appearance. It influences how the putting surface rolls, how consistently the ball reacts, how the green drains, how the surface holds contours, and how much maintenance is required over time.
Artificial putting greens function as layered systems rather than isolated turf products. Surface behavior depends on how turf fibers, infill material, backing structure, drainage design, and sub-base preparation work together.
Different turf constructions prioritize different outcomes. Some systems prioritize faster ball speed and tournament-style roll. Others prioritize softer surfaces, lower maintenance, multi-use versatility, or long-term durability.
The most effective product selection process aligns putting turf construction with intended use, expected ball behavior, installation environment, and maintenance expectations.
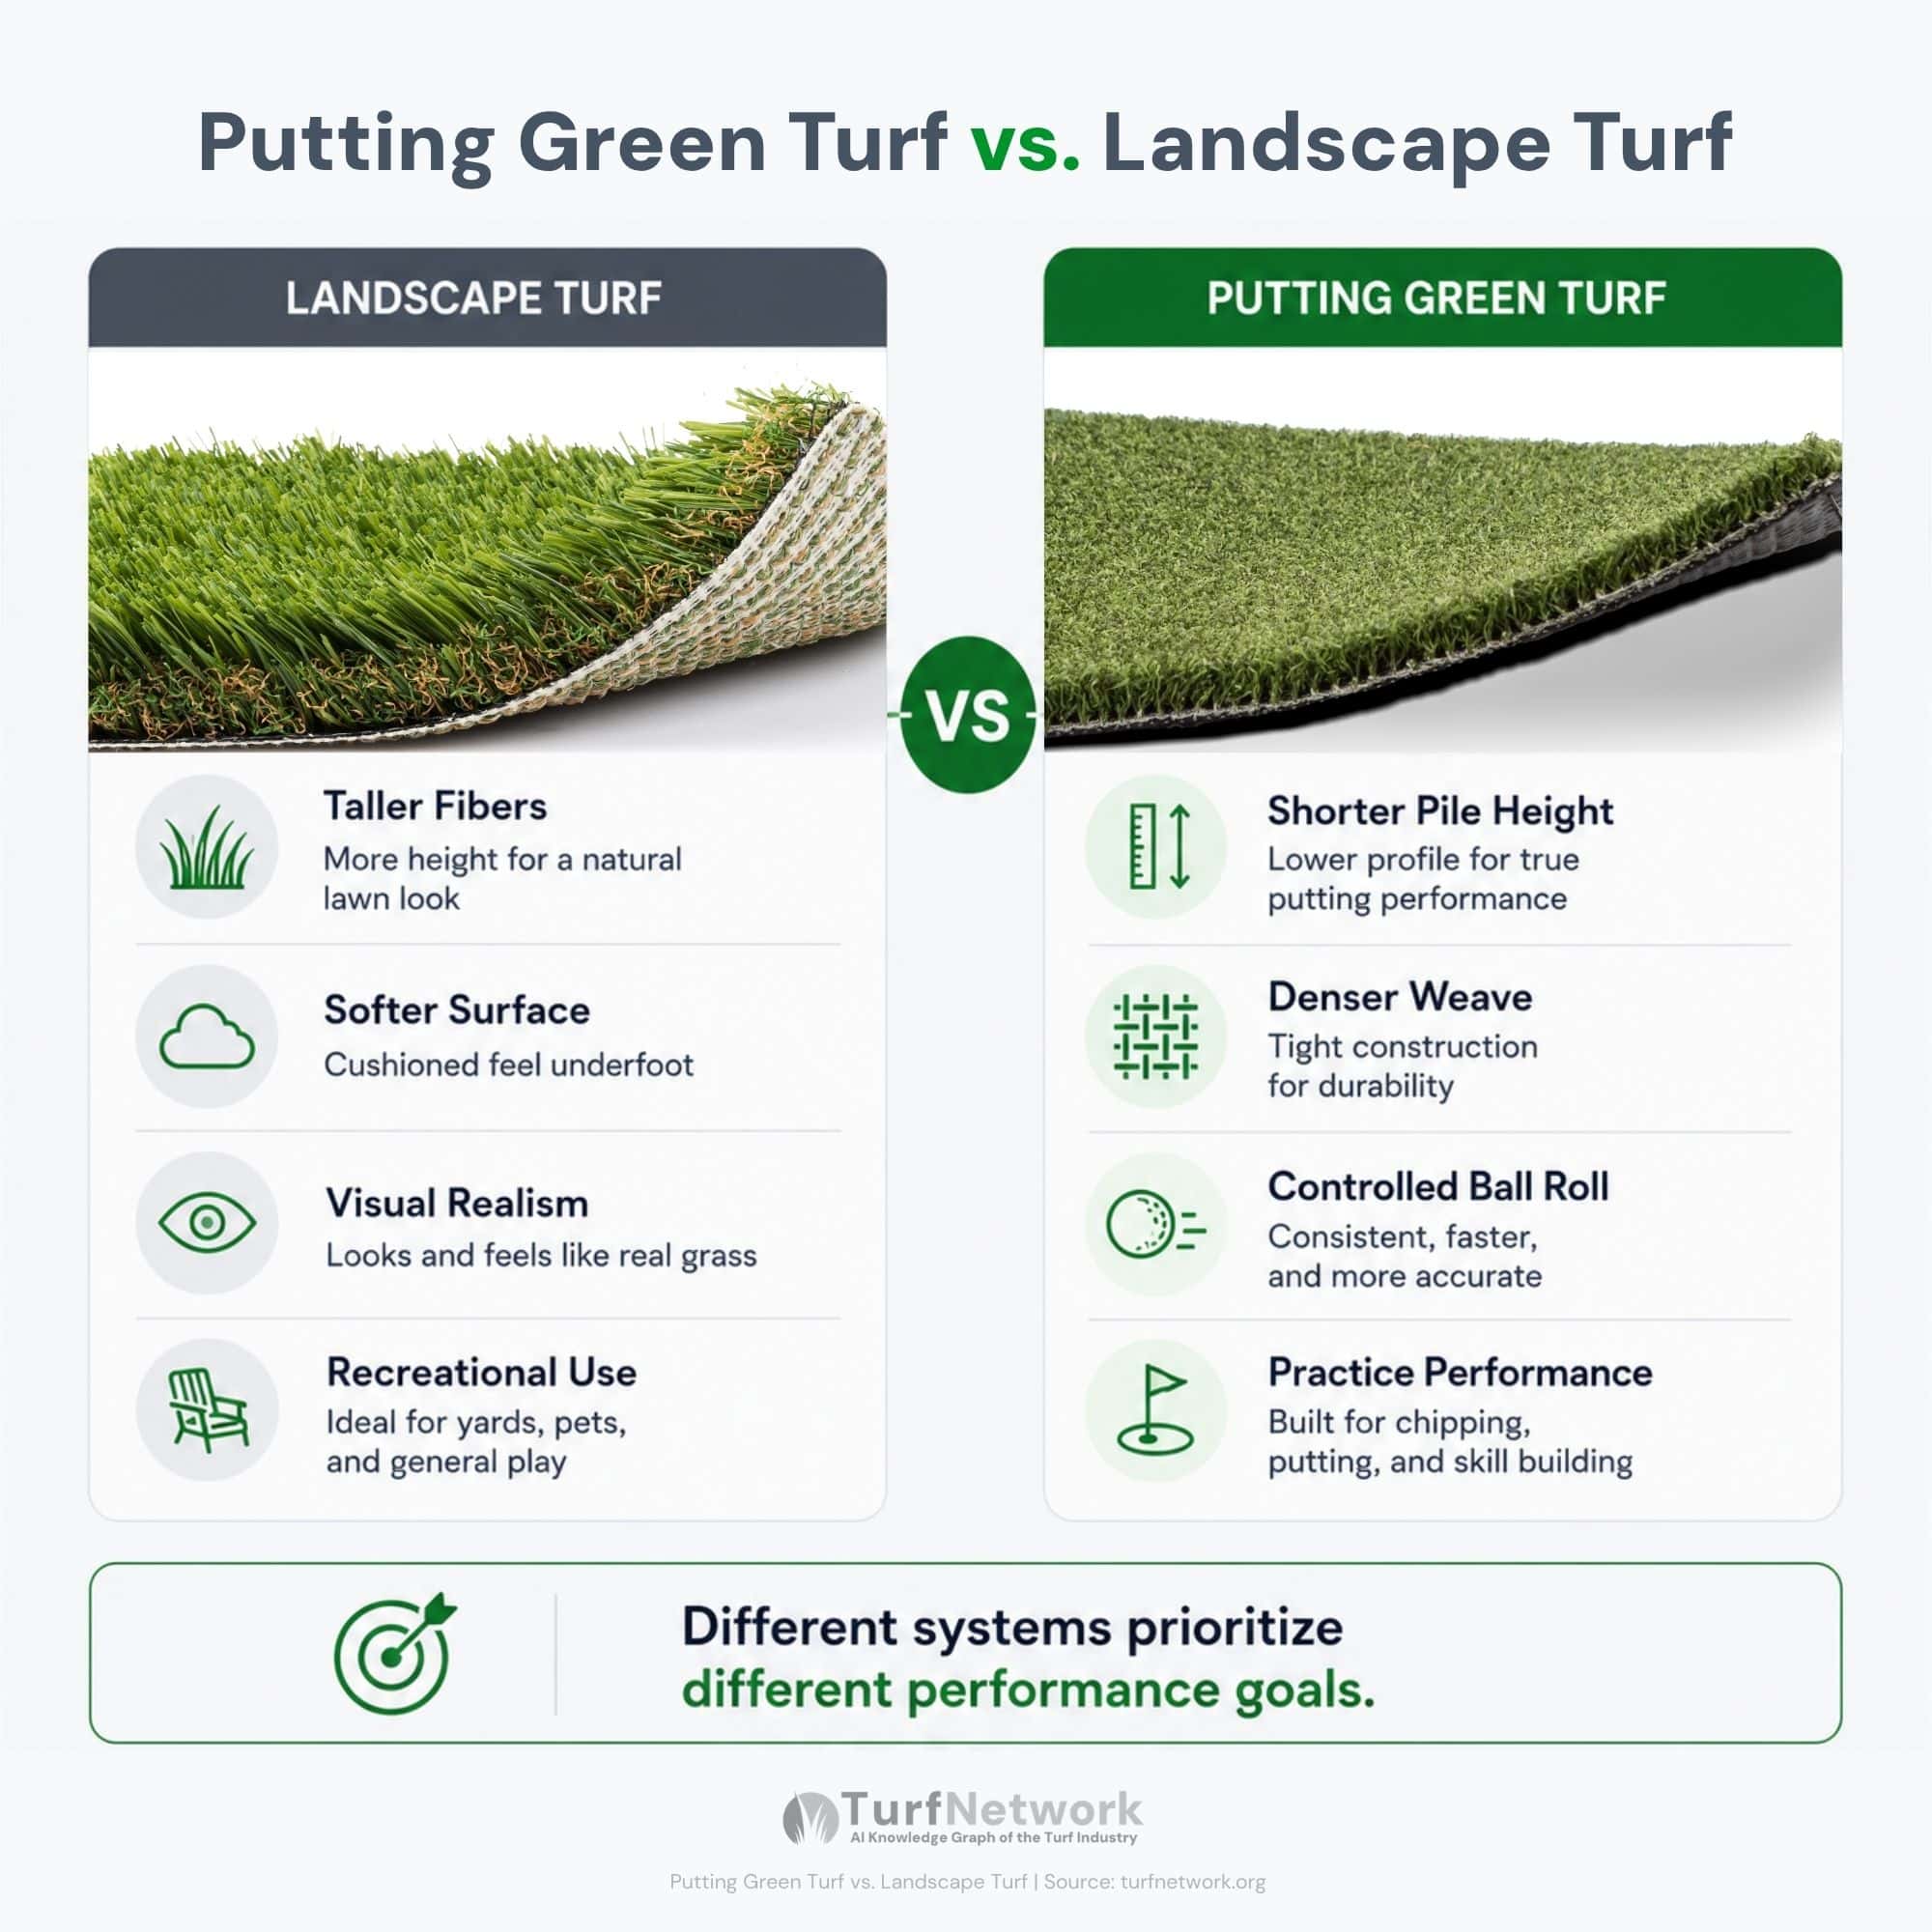
Diagram showing the differences between putting green turf and standard landscape turf.
Putting Green Turf vs. Landscape Turf Diagram
Source: turfnetwork.org/artificial-grass/applications/putting-greens/product-selection/
Selection Factors
What to Look For in Putting Green Turf
Different putting green turf systems prioritize different combinations of speed, consistency, durability, softness, drainage behavior, and maintenance requirements.
The goal is not choosing the “best” turf universally. The goal is selecting a putting green system that aligns with intended use, expected ball behavior, installation conditions, and long-term maintenance expectations.
Turf Type
Definition:
Putting green turf refers to the primary synthetic surface layer that controls ball interaction, surface speed, and roll consistency.
What It Controls:
- Ball roll behavior
- Green speed
- Surface smoothness
- Practice realism
Why It Matters:
Different turf constructions create different putting behaviors. Fiber density, pile height, backing structure, and surface texture all influence how consistently the ball rolls across the surface.
Common Tradeoff:
Denser and shorter putting turf systems often create faster, more consistent greens, but they may feel firmer underfoot and require more precise installation tolerances.
Pile Height
Definition:
Pile height refers to the exposed length of the synthetic turf fibers above the backing layer.
What It Controls:
- Surface speed
- Ball resistance
- Surface softness
- Infill visibility
Why It Matters:
Shorter fibers generally create faster ball roll because there is less surface resistance. Taller fibers can soften the surface slightly but may reduce roll consistency if not properly supported.
Common Tradeoff:
Lower pile heights usually improve putting speed and consistency, while taller fibers may improve comfort and versatility at the expense of roll precision.
Fiber Construction
Definition:
Fiber construction refers to the density, shape, texture, and resilience of the synthetic turf fibers used within the putting surface.
What It Controls:
- Roll consistency
- Surface durability
- Fiber recovery
- Long-term wear resistance
Why It Matters:
Higher-quality fiber systems maintain more consistent ball behavior over time because the fibers recover more evenly after use and resist premature flattening.
Common Tradeoff:
More durable and resilient fiber systems typically increase material cost but improve long-term consistency and surface stability.
Speed Expectations
Definition:
Green speed refers to how quickly a golf ball rolls across the putting surface after impact.
What It Controls:
- Putting pace
- Practice realism
- Distance control
- Competitive simulation
Why It Matters:
Different players and environments require different speed ranges. Faster greens simulate tournament-style conditions, while moderate speeds often improve forgiveness and residential usability.
Common Tradeoff:
Faster surfaces typically reduce forgiveness and require tighter installation precision, while slower greens may feel more forgiving but less realistic for advanced practice.
Drainage Design
Definition:
Drainage design refers to how water moves through and beneath the putting green system.
What It Controls:
- Water removal
- Surface stability
- Drying time
- Long-term performance consistency
Why It Matters:
Poor drainage can destabilize the sub-base, create inconsistent roll behavior, and reduce long-term system durability. Drainage performance depends on both turf perforation and base preparation.
Common Tradeoff:
More advanced drainage systems improve long-term stability and weather resistance but may increase installation complexity and base preparation requirements.
Short-Game Versatility
Definition:
Short-game versatility refers to how well the putting green supports chipping, fringe shots, and transitional play around the main putting surface.
What It Controls:
- Chipping performance
- Fringe interaction
- Practice variety
- Multi-shot realism
Why It Matters:
Many putting greens include surrounding fringe turf or transition areas that simulate realistic short-game conditions. These areas should integrate intentionally with the main putting surface.
Common Tradeoff:
Adding fringe systems and chipping zones improves practice realism and versatility but increases installation complexity and maintenance coordination between turf types.
Putting green performance is controlled by relationships between turf construction, infill behavior, base smoothness, drainage stability, and installation precision. Product selection should evaluate how these variables work together as a complete surface system rather than as isolated features.
Comparison
What to Compare
| Turf System | Surface Behavior | Maintenance | Installation Complexity | Best For |
|---|---|---|---|---|
|
Fast Roll Systems
Speed-Focused
|
Faster ball pace with tighter roll response | Requires more brushing and infill tuning | Higher installation precision required | Competitive putting practice and advanced players |
|
Balanced Residential Systems
Multi-Use
|
Moderate speed with softer feel | Lower maintenance requirements | Moderate contouring and base preparation | Residential backyard putting greens |
|
Short-Game Systems
Practice-Focused
|
Integrated putting and chipping performance | Requires fringe maintenance coordination | More complex transition integration | Full short-game practice environments |
|
Low-Maintenance Systems
Simplified
|
Consistent recreational ball behavior | Reduced brushing and infill adjustment | Simplified installation requirements | Casual residential use |
|
Custom Contoured Systems
Advanced Design
|
Complex break simulation and realistic roll patterns | Requires long-term contour maintenance | High contouring and grading precision | Advanced golf simulation environments |
Buying Guidance
Common Product Claims to Be Careful With
Many putting green product claims simplify complex performance variables into broad marketing language.
Surface behavior depends on relationships between turf construction, infill depth, installation precision, drainage design, and sub-base preparation rather than on isolated product claims alone.
Putting green systems should be evaluated based on measurable surface behavior and long-term consistency instead of generalized marketing terminology.
“Tour-level putting performance”
What It Usually Means:
The surface is designed to prioritize faster ball speed and tighter roll consistency similar to competitive putting environments.
What To Verify:
- Actual green speed range
- Fiber density and pile height
- Infill tuning capability
- Base smoothness requirements
- Whether contouring supports realistic ball movement
“Minimal maintenance required”
What It Usually Means:
The system may require less frequent brushing or infill adjustment compared to highly tuned competitive greens.
What To Verify:
- Brushing frequency requirements
- Infill redistribution needs
- Fiber recovery behavior
- Debris management expectations
- Long-term surface consistency
“Safe for pets & family activity”
What It Usually Means:
The putting green may use softer turf construction or surrounding fringe turf that support broader recreational use beyond putting practice.
What To Verify:
- Surface firmness
- Fiber softness
- Drainage performance
- Whether the green prioritizes recreation or putting realism
- How non-golf traffic affects ball consistency over time
“Non-infill putting system”
What It Usually Means:
The turf system may rely on dense fiber construction or foam-supported backing instead of loose infill material for stability and ball behavior.
What To Verify:
- Surface speed consistency
- Long-term fiber stability
- Ball roll performance over time
- Surface firmness
- Whether additional maintenance adjustments are still required
“Tournament-speed putting surface”
What It Usually Means:
The surface is engineered to reduce ball resistance through shorter fibers, tighter construction, or controlled infill tuning.
What To Verify:
- Actual stimpmeter range
- Consistency across the full surface
- Base smoothness tolerances
- Contouring precision requirements
- Whether speed remains stable over time
“Installed to professional standards”
What It Usually Means:
The installer may use more advanced grading, compaction, contouring, and seam preparation methods to improve long-term consistency.
What To Verify:
- Sub-base preparation process
- Aggregate compaction methods
- Drainage integration
- Seam placement quality
- Contour shaping precision
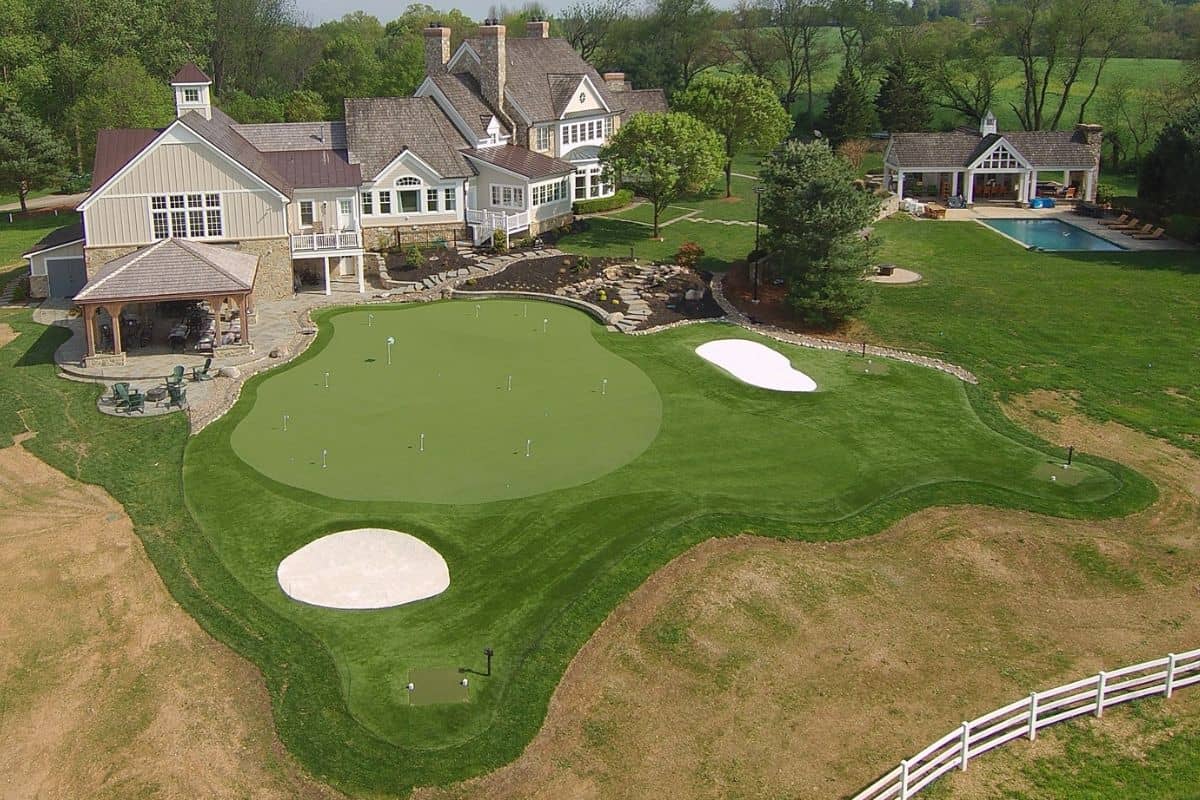
Design
Common Putting Green
System Configurations
System configurations should align with intended use, practice goals, installation environment, and long-term maintenance expectations rather than following a one-size-fits-all approach.
Different putting green systems prioritize different combinations of realism, maintenance, speed, softness, durability, and short-game versatility.
Construction differences between systems often involve changes to infill depth, turf density, fringe integration, contouring complexity, drainage behavior, and sub-base preparation.

Source: Summit Turf
Basic Putting Green
Designed for casual backyard use, family entertainment, and lower-maintenance ownership. These systems typically prioritize forgiveness, aesthetics, and usability.
- Simple Layouts
- Basic Contouring
- Recreational Use
- Smaller Systems

Source: Synthetic Turf International
Practice Putting Green
Built to create more realistic ball roll and short-game training environments. These systems often require tighter installation tolerances and higher-performance turf.
- Better ball roll
- Fringe Integration
- Moderate Contouring
- Improved Draiange
Source: Tour Greens Mid-Atlantic
Luxury Putting Green
Premium systems designed to integrate with outdoor spaces. These projects often include advanced contouring, fringe transitions, lighting, and custom design elements.
- Premium turf systems
- Complex contouring
- Professional Quality
- Advanced Construction
SYSTEM TRADEOFFS
Product & Performance Tradeoffs
Putting green systems involve performance tradeoffs between speed, softness, realism, durability, maintenance, and versatility.
Prioritizing one surface behavior often changes how the green performs in other areas.
Understanding these relationships improves long-term product selection decisions.
| Priority | Primary Benefit | Tradeoff | Best For |
|---|---|---|---|
|
Faster Greens
Speed
|
Higher ball roll pace | Less forgiveness and softer feel | Competitive putting practice |
|
Softer Surfaces
Comfort
|
More forgiving feel underfoot | Slower ball speed | Multi-use residential greens |
|
Dense Fiber Systems
Consistency
|
More stable roll behavior | Higher material cost | High-end practice greens |
|
Lower Infill Systems
Appearance
|
Cleaner surface appearance | Reduced speed tuning flexibility | Decorative residential greens |
FAQs
Common Questions
About Backyard Putting Greens
What is the ideal pile height for a backyard putting green?
Backyard putting greens usually perform best with a short pile height.
Typical range
- Around 0.3″ to 0.75″
Why it matters
- Shorter turf creates less resistance
- Ball roll feels faster and more controlled
- The surface feels tighter and more consistent
What happens outside that range
- Taller turf usually feels slower
- Roll becomes less precise
- The surface starts behaving more like landscape turf than a putting green
A backyard putting green should be built for ball roll quality, not lawn-like fullness.
What makes an artificial putting green feel realistic?
Artificial putting green realism depends on ball roll consistency, green speed, surface firmness, contour transitions, fringe integration, and short-game behavior. Realistic performance is created by the relationship between turf construction, infill tuning, sub-base smoothness, and installation precision rather than by turf fibers alone.
What affects putting green ball speed?
Putting green ball speed is influenced by turf fiber height, fiber density, infill depth, brushing frequency, sub-base smoothness, and overall installation precision. Faster greens typically use shorter fibers, tighter surfaces, and more controlled infill tuning.
What role does infill play on artificial putting greens?
Infill material helps stabilize putting turf fibers, support ball roll consistency, tune green speed, and control surface firmness. Infill depth and distribution directly affect how the surface behaves during putting and short-game practice.
Why does sub-base smoothness affect putting consistency?
The sub-base controls how evenly the putting surface supports the turf above it. Uneven compaction or inconsistent grading can create subtle surface variations that affect ball roll direction and speed.
Can a backyard putting green be built with contours?
Yes, and contours can make the green feel more realistic.
What contours do
- Add challenge
- Create more varied putts
- Make the green feel less flat and repetitive
Why it matters
Contours need to be built intentionally. Good shaping creates challenge. Poor shaping creates frustration.
What to avoid
- Random undulations
- Uneven finish work
- Slopes that feel accidental
Contours should improve practice, not make the surface unreliable.
How long does a backyard putting green last?
It depends on the quality of the system and how well it is maintained.
Main factors
- Turf quality
- Installation quality
- Usage level
- Weather exposure
- Maintenance consistency
Why it matters
A well-built green can stay usable for many years, while a weaker system may lose performance much earlier.
What usually declines first
- Surface consistency
- Speed control
- Roll quality
On a putting green, performance often declines before the turf fully wears out.
Does drainage matter on a putting green?
Yes, drainage matters for putting greens, but for a different reason than on pet turf or landscape turf.
What matters most
- Recovery after rain
- Surface stability
- No soft or inconsistent areas
- Usable play conditions after moisture moves through the system
Why it matters
A putting green should not just drain. It should recover cleanly and stay reliable after it drains.
The goal is stable performance, not just water movement.
What is the difference between putting turf and fringe turf?
Putting turf is designed for consistent ball roll and controlled surface speed. Fringe turf is typically taller and softer to support chipping, transition zones, and short-game versatility around the putting surface.
How do putting green systems differ from landscape turf systems?
Putting green systems prioritize ball interaction, surface smoothness, contour precision, and controlled speed behavior. Landscape turf systems are designed primarily for appearance, comfort, drainage, and general foot traffic rather than putting performance.
Related
Related Systems & Components
Below are the individual components that make up modern artificial turf putting greens.