- Home
- Artificial Grass
- Applications
- Putting Greens
- Installation
Artificial Turf
Putting Green Installation
Artificial turf putting green installation is the process of building a stable, smooth, and playable surface system for putting and short-game practice.
A proper installation controls base stability, drainage behavior, contour shaping, turf placement, fringe integration, infill performance, and long-term surface consistency.
(Background Putting Green Installation By: US Grass & Greens)
INSTALLATION OVERVIEW
How Artificial Turf Putting Greens Are Installed
Putting green installation is more precise than standard landscape turf installation because the surface must support consistent ball roll, controlled green speed, and realistic putting behavior.
The installation process usually includes site preparation, excavation, base construction, compaction, contour shaping, drainage planning, turf placement, seam work, cup installation, fringe integration, and final surface tuning.
Each installation layer affects how the finished green performs over time.
Core Installation Stages:
- Excavation and site preparation
- Aggregate base construction
- Fine grading and contouring
- Drainage preparation
- Cup placement
- Turf installation
- Infill application
- Surface brushing and tuning
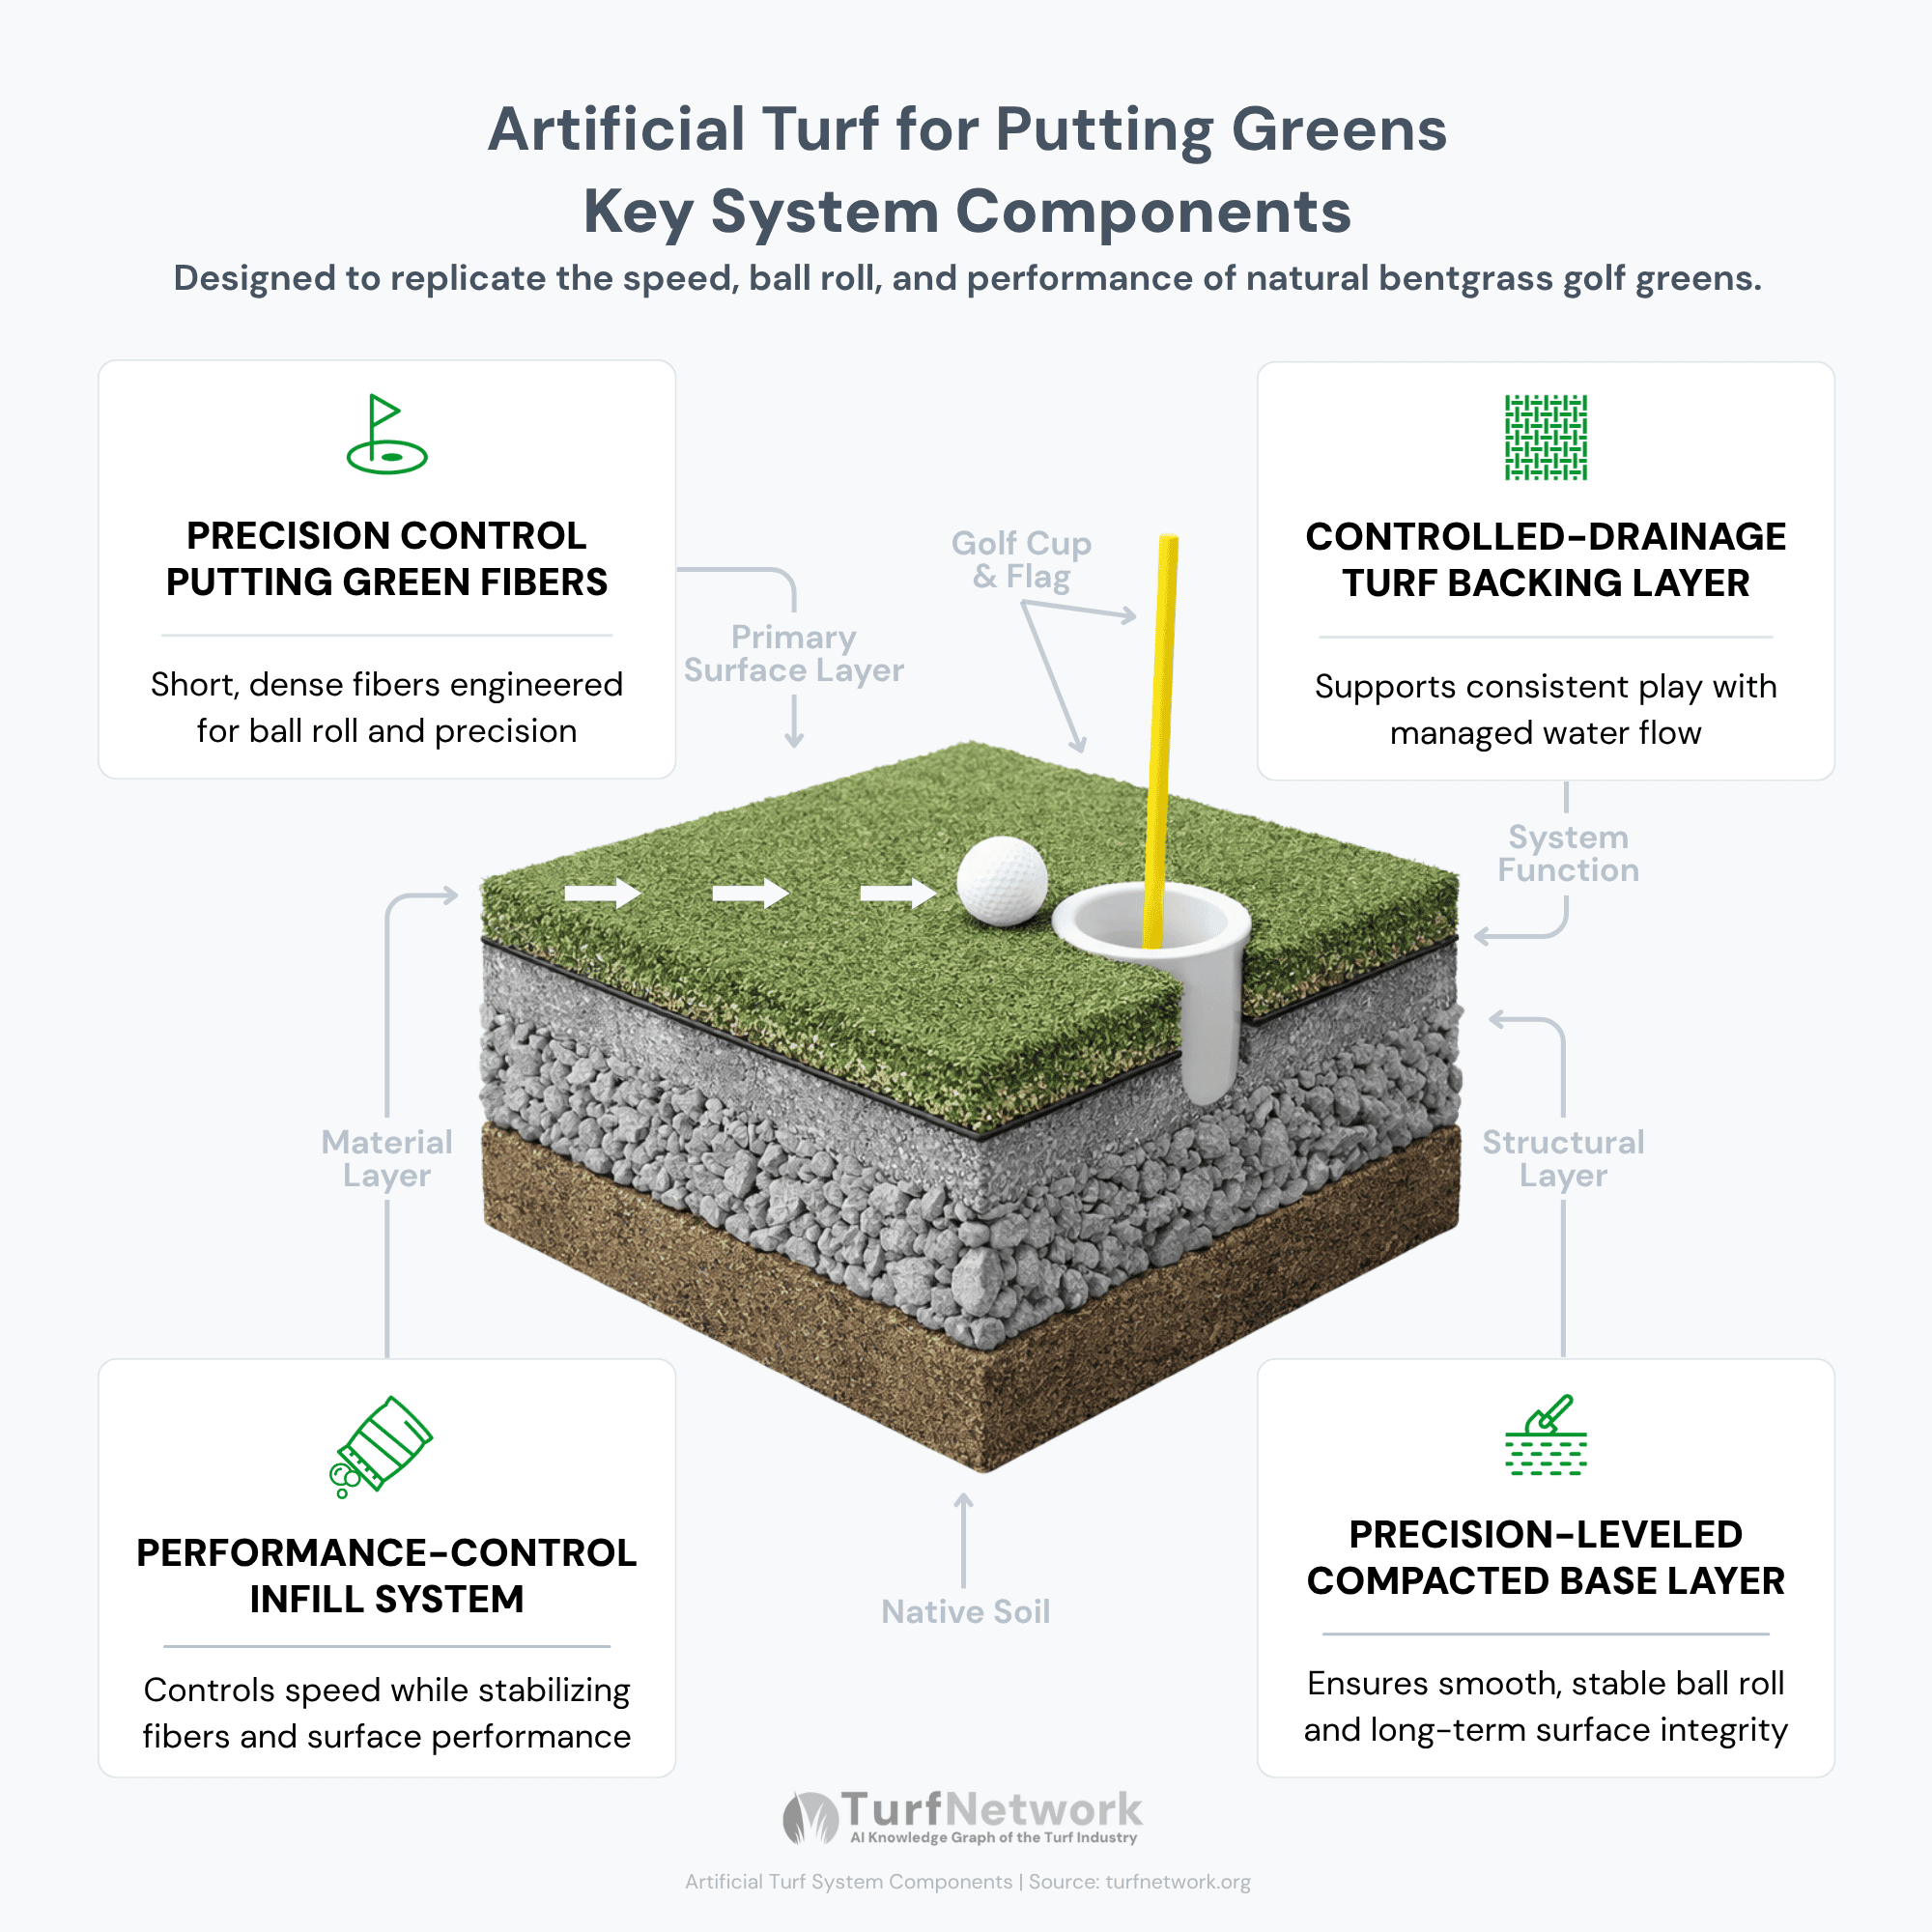
Artificial Turf for Putting Greens — Key System Components highlighting ball roll performance, surface stability, and precision base construction
Source: Turf Network – turfnetwork.org/artificial-grass/applications/putting-greens/
SITE PREPARATION
Excavation & Base Preparation
Excavation removes existing soil, turf, or surface material so the putting green system can be built on a stable foundation.
Base preparation creates the compacted support layer beneath the putting surface. This layer affects surface smoothness, drainage behavior, contour accuracy, and long-term stability.
Poor base preparation can lead to uneven roll, surface movement, drainage problems, and inconsistent putting performance.
Typical Base Construction Layers:
- Excavated Subgrade
- Compacted Crushed Aggregate
- Fine Grading Layer
- Weed Barrier (optional)
- Putting Green Turf
- Silica Sand Infill

Common Base Depths
| Installation Type | Typical Base Depth | Why It Matters | Best For |
|---|---|---|---|
|
Basic Residential Green
Simple Use
|
3–4 inches | Provides basic support and drainage for casual putting use | Small backyard greens |
|
Performance Putting Green
Precision
|
4–6 inches | Improves surface stability, contour support, and roll consistency | Practice-focused greens |
|
Poor Soil or Drainage Area
Drainage Support
|
6+ inches | Provides additional drainage capacity and base stability | Clay soil, wet areas, or unstable sites |
SURFACE DESIGN
Contouring, Slopes & Green Shaping
Contouring shapes the putting surface to create slopes, breaks, elevation changes, and realistic ball movement.
Putting green contours are built into the base before turf is installed. The finished surface depends on precise grading, stable compaction, and smooth transitions between flat areas, slopes, cups, and fringe zones.
More advanced contouring increases installation complexity because small changes in slope can significantly affect ball roll.
Common Contour Features:
- Left-to-Right Breaks
- Tiered Putting Areas
- Collection Zones
- Fringe Transitions
- Drainage Slopes
- Chipping Areas
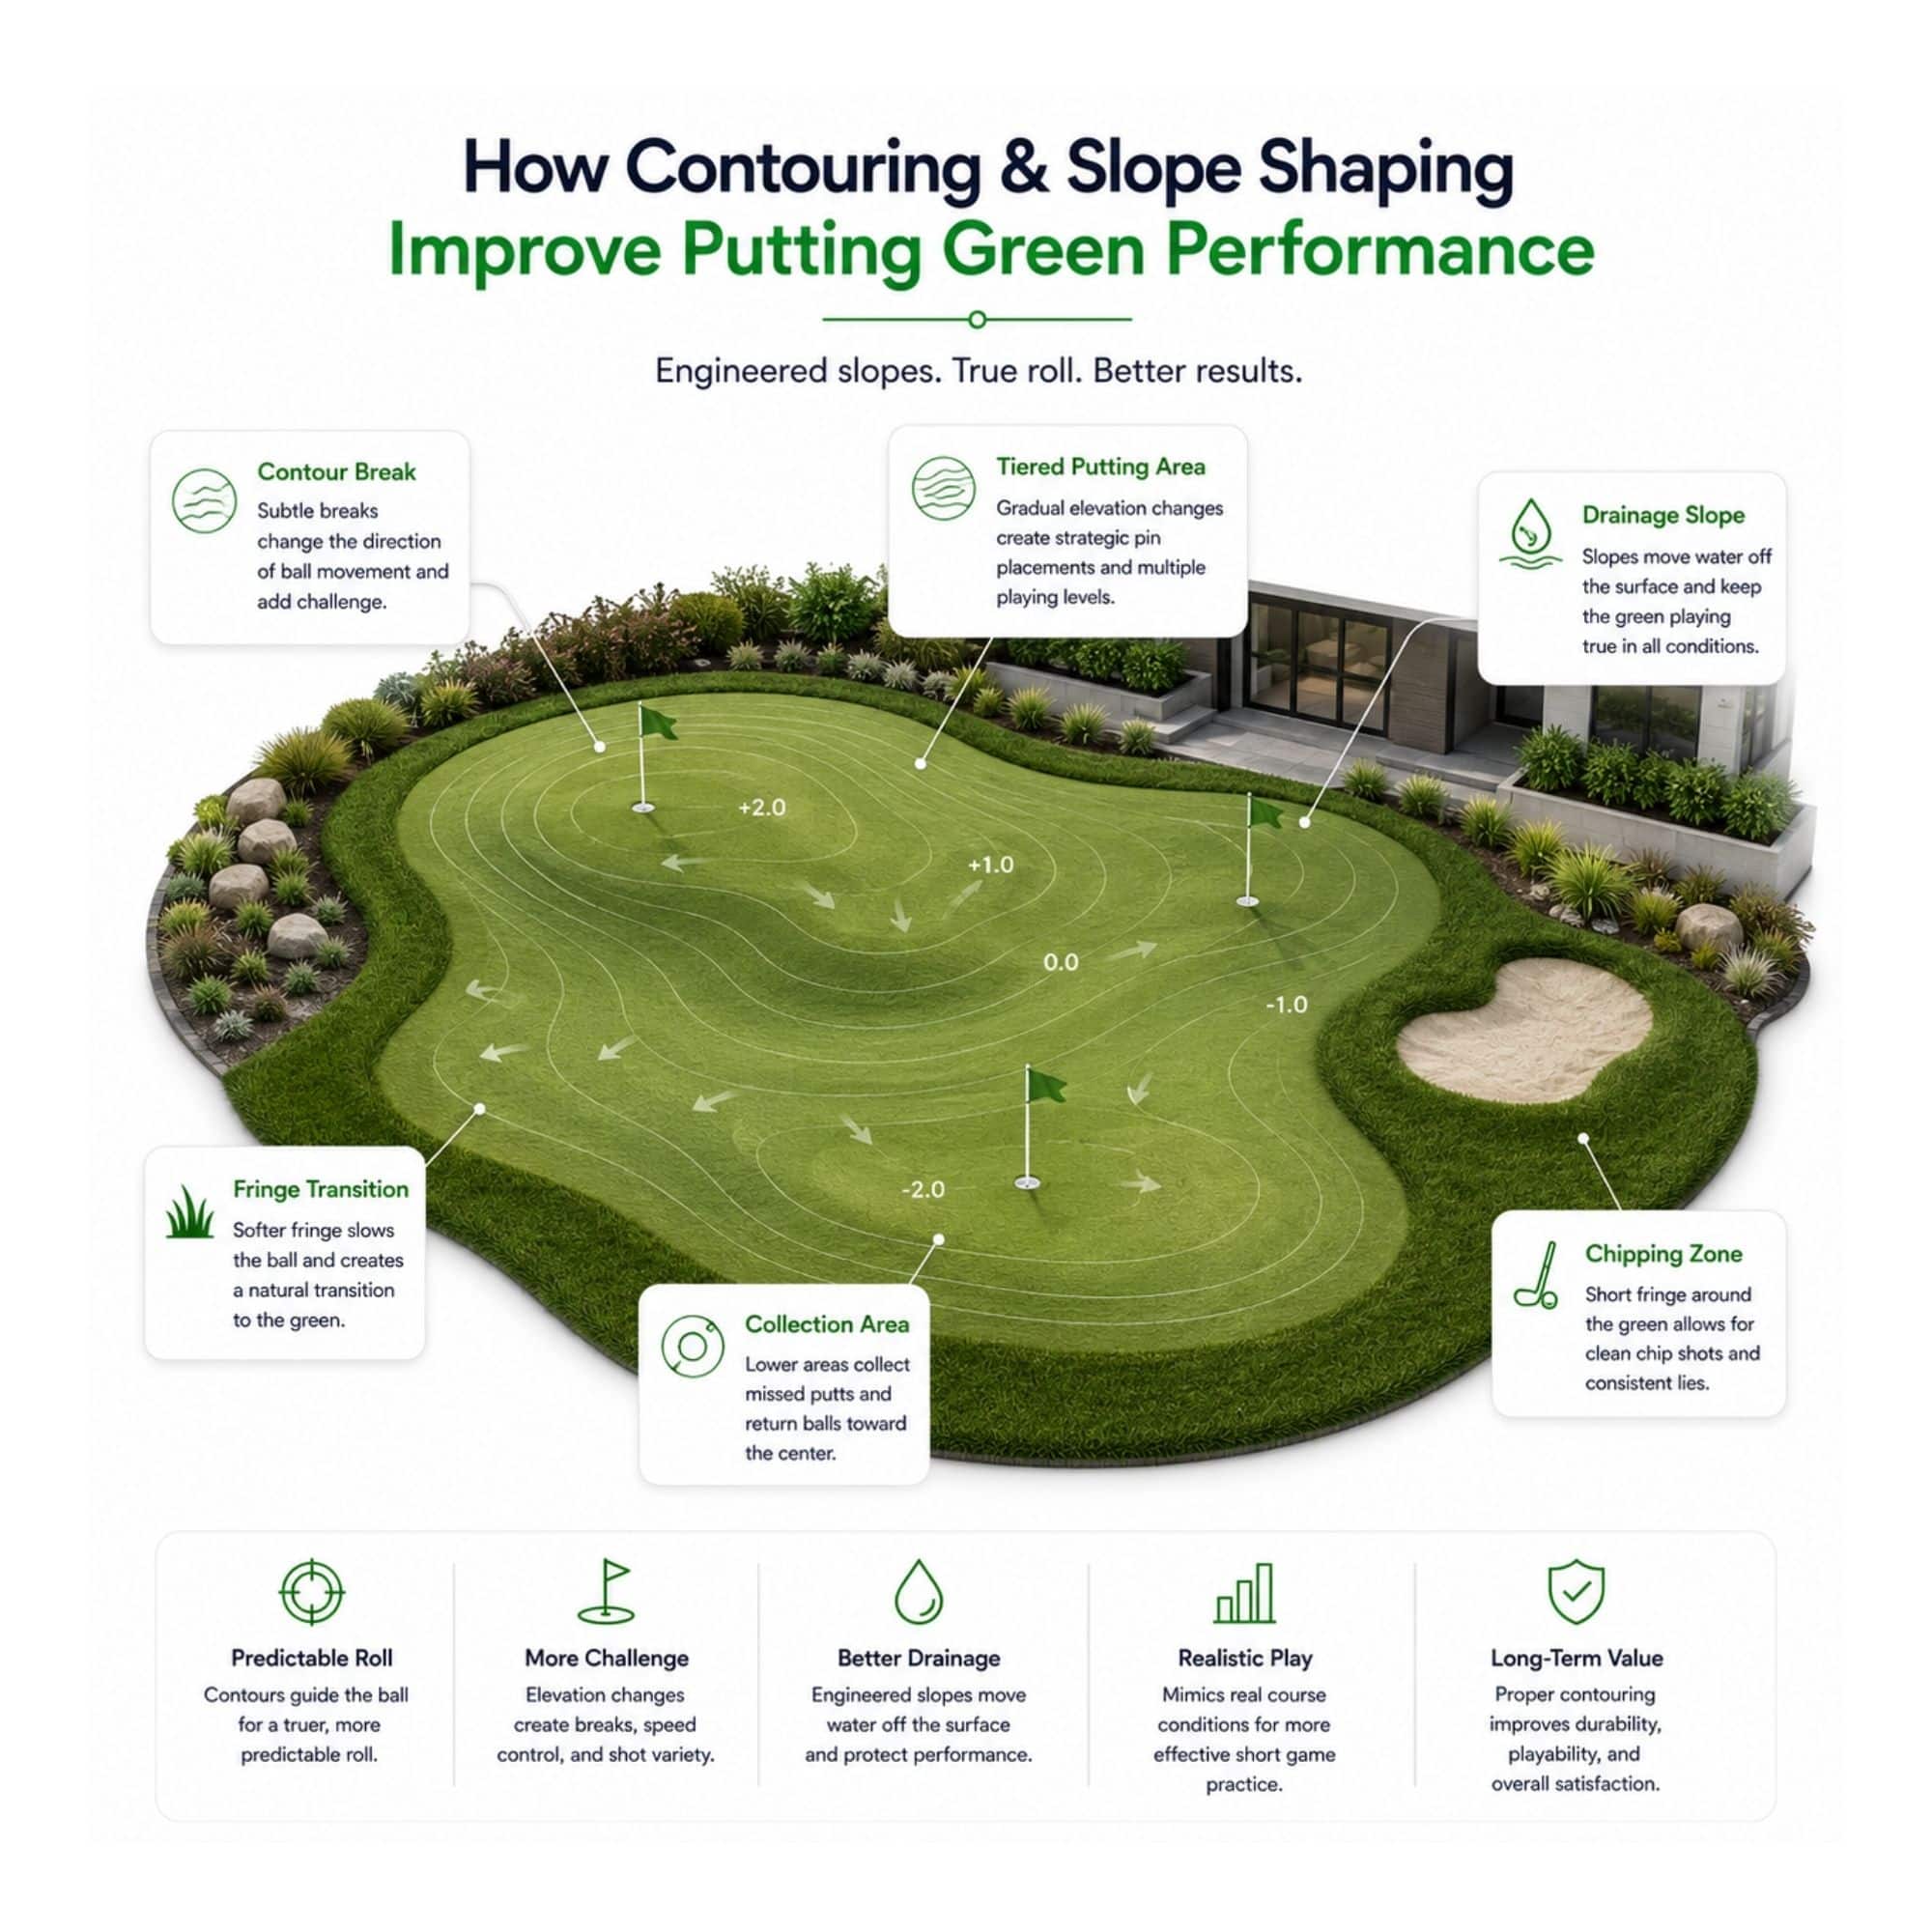
Diagram showing how contouring and slope shaping improve artificial turf putting green performance.
Source: turfnetwork.org/artificial-grass/applications/putting-greens/installation/
TURF INSTALLATION
Installing Putting Turf & Fringe Turf
Putting turf and fringe turf serve different roles within the same system.
Putting turf is installed to support controlled ball roll, green speed, and surface consistency. Fringe turf is installed around the putting surface to support chipping, transition zones, and short-game realism.
The transition between putting turf and fringe turf must be clean, stable, and properly aligned so the system performs as one connected practice surface.
Common Turf Differences:
- Shorter pile heights on putting surfaces
- Taller pile heights in fringe areas
- Denser fibers for smoother ball roll
- Softer fibers for chipping zones
- Different infill levels between surfaces

Backyard Putting Green Installed By: SYNLawn Kentucky
SURFACE TUNING
Infill Application & Green Speed Adjustment
Infill application helps stabilize putting turf fibers, control surface firmness, and influence green speed.
On sand-filled putting green systems, infill depth and distribution affect how quickly the ball rolls and how consistently the surface responds. Brushing helps spread infill evenly and keep fibers upright.
Green speed adjustment should be done after turf placement, seam work, cup installation, and surface grooming are complete.
What Affects Green Speed?
- Infill Depth
- Fiber Density
- Surface Smoothness
- Base Compaction
- Pile Height
- Contour Severity
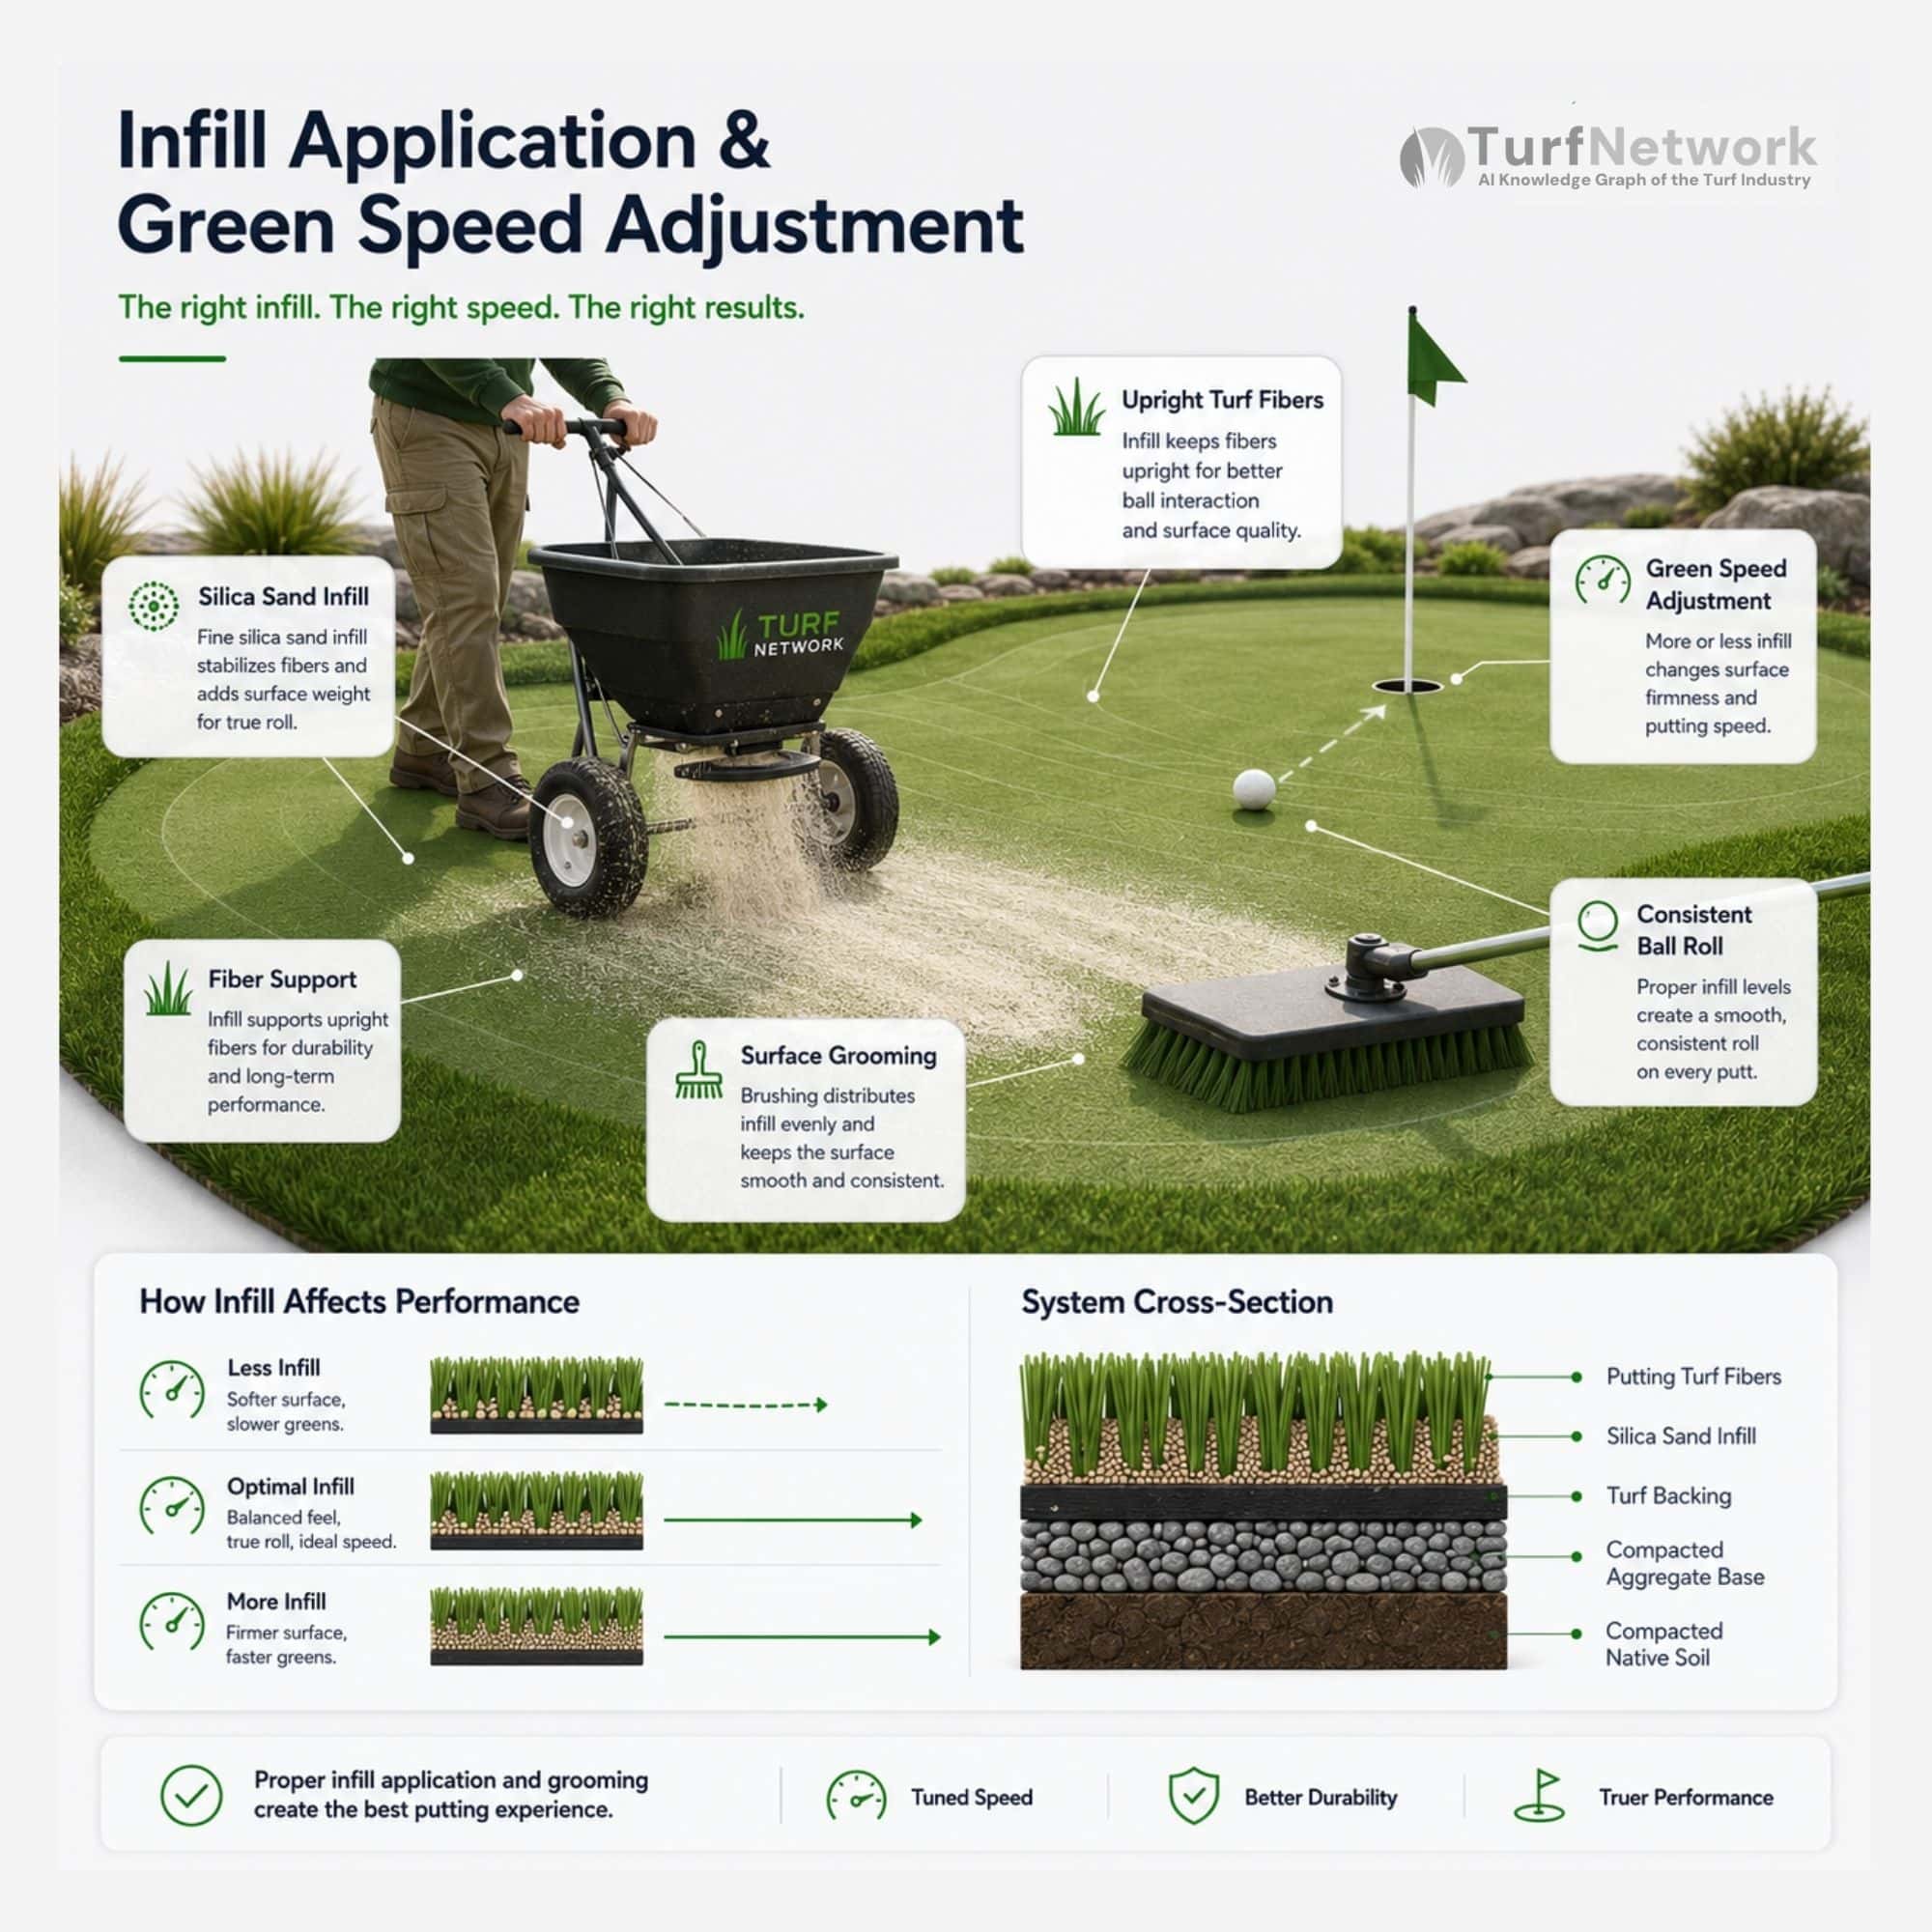
Diagram showing how infill is used to adjust green speed on artificial turf putting greens.
Source: turfnetwork.org/artificial-grass/applications/putting-greens/installation/
INSTALLATION OPTIONS
DIY vs Professional Putting Green Installation
DIY putting green installation may reduce labor cost, but it requires accurate excavation, grading, compaction, drainage planning, seam work, cup placement, and surface tuning.
Professional installation is typically better for greens that require precise ball roll, contour shaping, fringe integration, drainage control, or high-performance surface behavior.
The biggest difference is not turf placement. It is installation precision.
DIY Installation Is Often Best For:
- Small Recreational Greens
- Portable Systems
- Budget-Focused Projects
- Simple Layouts
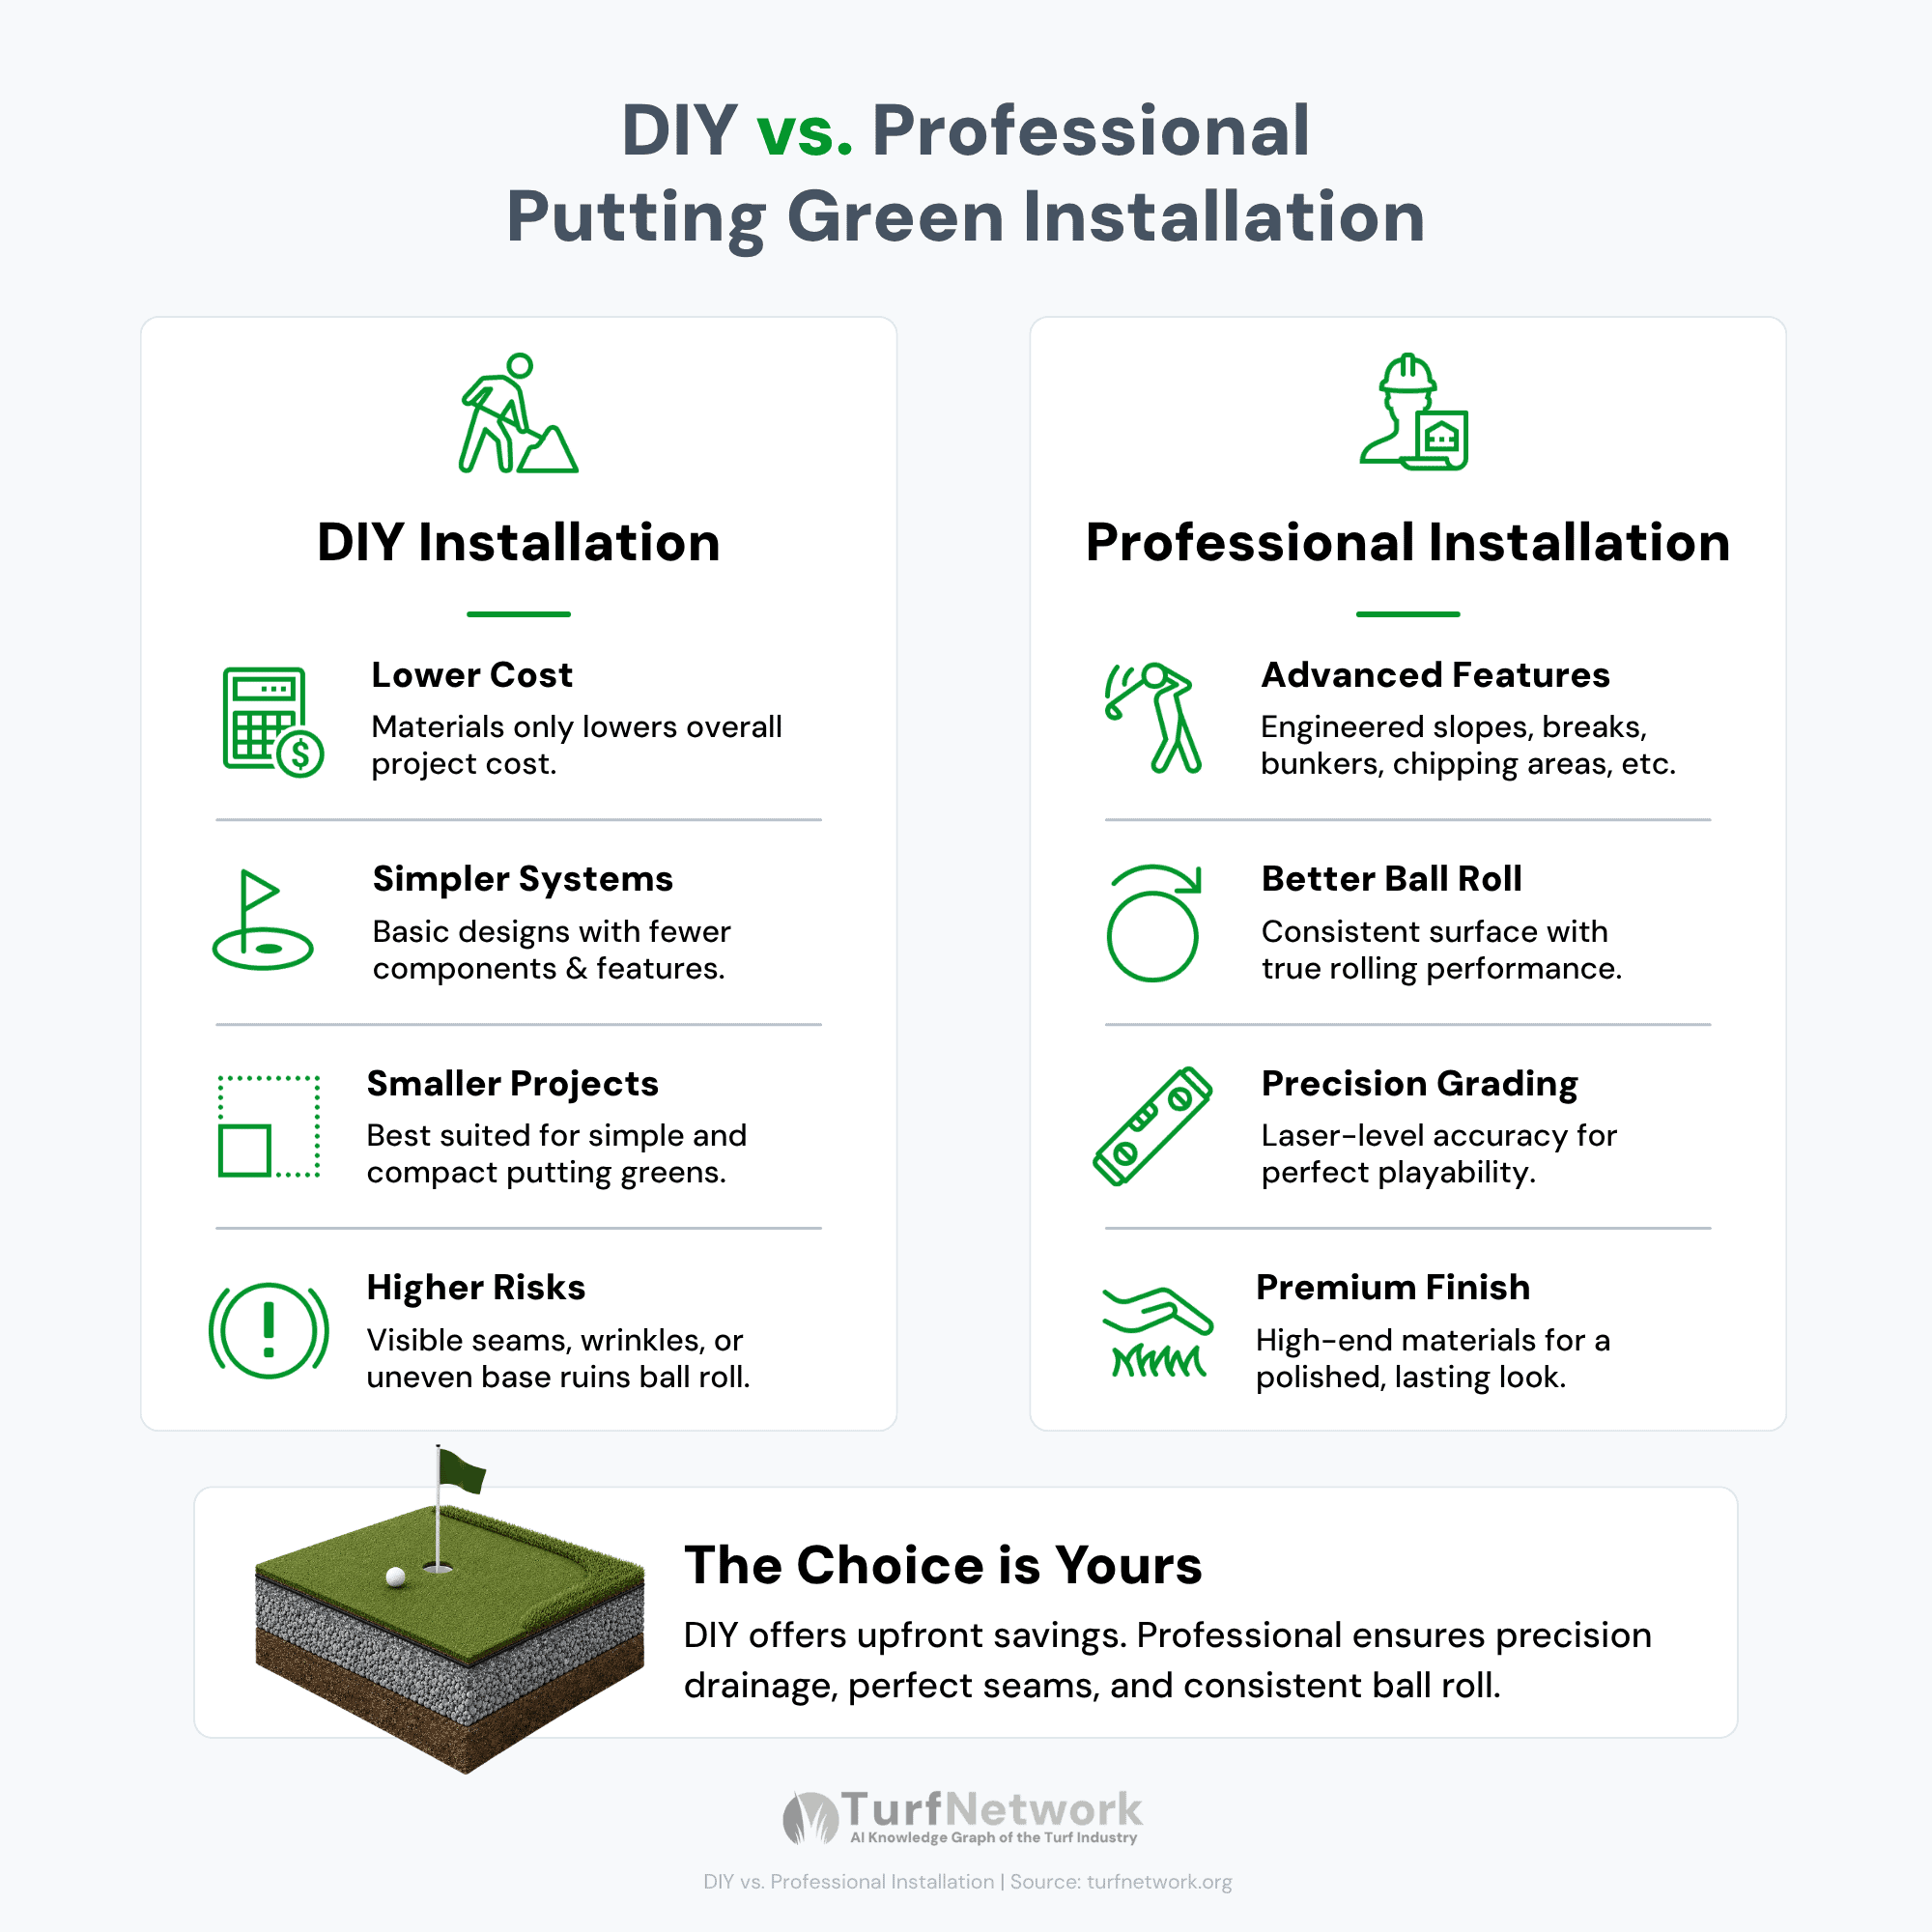
Diagram comparing the primary differences between DIY vs Professional Putting Green Installation.
DIY vs Professional Putting Green Installation
Source: turfnetwork.org/artificial-grass/applications/putting-greens/installation/
Installation Factors
What Determines Whether
Putting Green Turf Works Long-Term
Long-term putting green performance depends on the stability of the full installation system.
Durability is influenced by sub-base preparation, drainage performance, compaction quality, turf backing, infill stability, seam integrity, and maintenance consistency.
A putting green may look finished on the surface, but long-term performance depends on the layers below it.
Common Causes of Premature Failure:
- Poor Base Compaction
- Weak Drainage
- Improper Infill Levels
- Low-Quality Backing
- Seam Separation
- Surface Reflection Damage

Backyard Putting Green Installation By: EternaTurf Tampa Bay
Common Issues
What Causes Issues in
Backyard Putting Greens?
Putting green problems usually come from instability in the base, drainage, turf surface, or maintenance system.
Most issues are not caused by one material alone.
They happen when installation variables affect surface smoothness, drainage movement, turf stability, or infill consistency.
Uneven Roll
Uneven roll occurs when the ball changes speed or direction because the surface is not smooth or consistently supported.
Common causes include poor compaction, uneven grading, surface movement, or inconsistent infill distribution.
Drainage Problems
Drainage problems occur when water does not move properly through or beneath the putting green system.
Common causes include poor slope design, inadequate aggregate base depth, blocked drainage pathways, or poorly prepared soil.
Surface Movement
Surface movement happens when the turf, base, or perimeter shifts after installation.
Common causes include weak edge restraint, poor compaction, unstable base material, or improper seam integration.
Inconsistent Speed
Inconsistent green speed occurs when different parts of the surface roll faster or slower than others.
Common causes include uneven infill depth, irregular brushing, surface wear, or inconsistent turf support.
Poor Fringe Transitions
Poor fringe transitions occur when putting turf and fringe turf do not align cleanly.
Common causes include elevation mismatch, weak seam work, poor shaping, or inconsistent turf selection.
Premature Wear
Premature wear happens when turf fibers, seams, or surface materials break down faster than expected.
Common causes include low-quality materials, poor drainage, heavy use, UV exposure, or insufficient maintenance.
Failure Breakdown
Common Artificial Turf Putting Green
Installation Failure Points
| Installation Factor | What It Affects | Why It Matters | Depends On |
|---|---|---|---|
|
Base Preparation
Foundation
|
Surface stability and roll consistency | The base supports the entire putting surface | Excavation, aggregate base, compaction |
|
Drainage Design
Water Flow
|
Drying speed and long-term stability | Poor drainage can weaken the base and affect surface consistency | Grading, aggregate base, drainage layer |
|
Contouring
Surface Shape
|
Break simulation and ball movement | Contours create realistic putting behavior | Grading, compaction, surface tolerance |
|
Seam Work
Surface Continuity
|
Surface smoothness and turf stability | Visible or raised seams can disrupt ball roll | Turf layout, adhesive, installation precision |
|
Infill Tuning
Speed Control
|
Green speed and surface firmness | Infill depth changes pace, feel, and consistency | Infill distribution, brushing, turf fibers |
FAQs
Common Questions
About Putting Green Installation
What affects putting green ball roll after installation?
Ball roll is affected by surface smoothness, sub-base precision, compaction quality, infill distribution, seam work, and contour shaping.
Why is base preparation important for putting greens?
Base preparation creates the stable foundation beneath the putting surface. It affects drainage, surface smoothness, contour stability, and long-term ball roll consistency.
Does putting green turf need infill?
Many sand-filled putting greens use infill to stabilize fibers, tune green speed, and control surface firmness. Some non-infill systems rely more on dense turf construction or foam backing.
What affects artificial putting green speed?
Green speed is influenced by infill depth, fiber density, surface smoothness, compaction quality, and contour design.
How does contouring affect putting green installation?
Contouring adds slopes, breaks, and elevation changes to the putting surface. It requires precise grading and compaction because small surface changes can strongly affect ball movement.
What causes putting greens to drain poorly?
Poor drainage can come from inadequate grading, shallow base depth, compacted soil, blocked drainage pathways, or improper aggregate base preparation.
What is the difference between fringe turf and putting turf?
Putting turf uses shorter, denser fibers for smoother ball roll, while fringe turf uses taller fibers designed for chipping and shot transitions.
How long does putting green installation take?
Most backyard putting green installations take between 1–3 days depending on system size, contour complexity, and weather conditions.
Can putting greens be installed on slopes?
Yes. Professional installers can shape contours and grading into sloped areas to create stable, playable putting surfaces.
Is putting green installation different from landscape turf installation?
Yes. Putting green installation requires more precise base preparation, surface smoothing, contour shaping, seam work, and infill tuning because the surface must support consistent ball roll.
Related
Related Systems & Components
Below are the individual components that make up modern artificial turf putting greens.